Wednesday, July 4, 2018

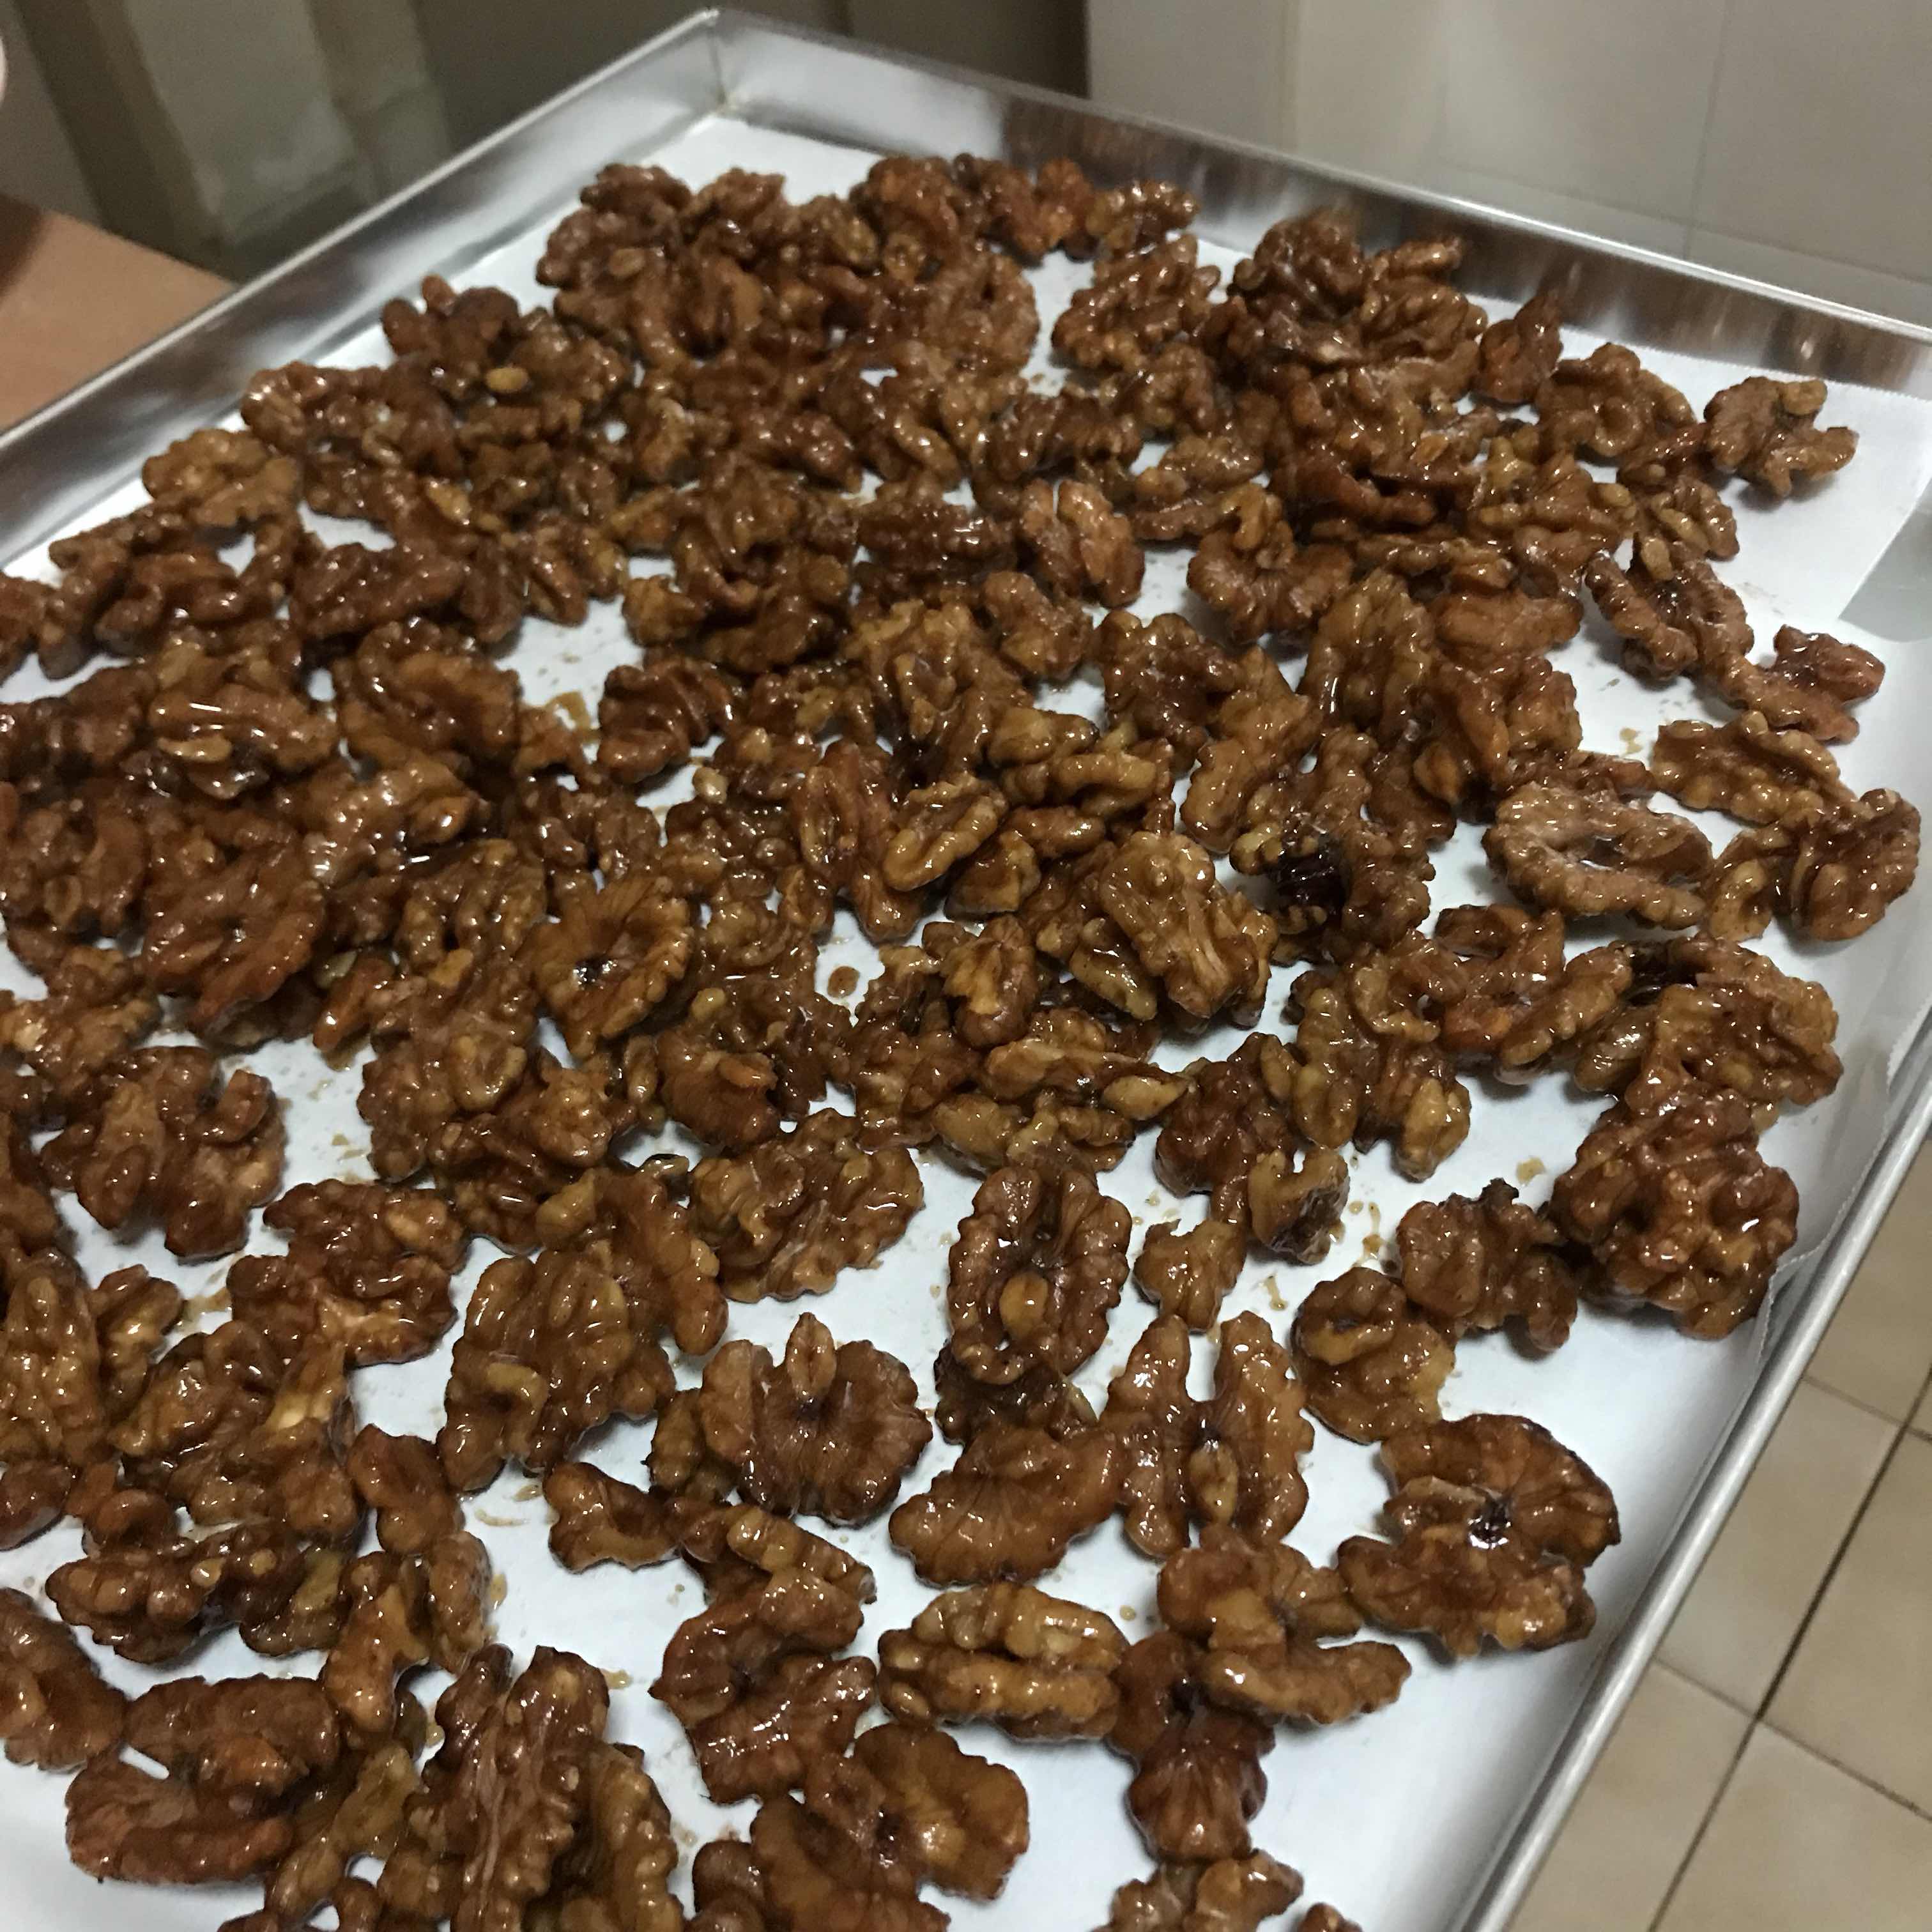
Maple syrup glazed walnut

So, this pack of walnut in the house has been staring at me for quite sometime now and yesterday found a time to do something with it. I was intentionally intending to eat it as it is but i find it very bitter so I was thinking, why not I glazed it with sugar or something? I found these ingredients when i rummaged through the kitchen and that's how I made this simple yet delectable candied Walnuts. Don't get me wrong, they're yummy if you eat them on their own but I think a sprinkle of sugar will give it a little thrill like how life should be, dont you think? hehehe.

I used Martha stewards recipe below:
https://www.marthastewart.com/354905/maple-candied-walnuts

Here are the ingredients:


The finish product after taking it out from the oven. Sorry I've been lazy taking pics of the entire process. Will do better next time.


Tuesday, March 14, 2017

Italian meringue buttercream in hot humid weather


Lovely rose isn't it? Thanks to my very stable Italian meringue buttercream. The buttercream held it's form for entire day in my 30deg hot kitchen. That's the stability I require from a buttercream in this very hot and humid climate in tropical Singapore. 

For us living in Singapore or Philippines or any other parts of the world with a tropical humid climate, Italian buttercream is always a challenge to make as most recipes were designed to work in cool weather or perhaps when your kitchen is airconditioned.

What is the secret to perfect it? Simple! A stone-cold butter! One that you just take out from the fridge, cut into cubes and throw straight into the mixer.

I hate those recipes that calls for room temperature soft butter coz I wasted loads of sticks of butter and they just don't work. Sure, it incorporates more air into the mixture but this isn't true when you are in a very hot kitchen as your butter will just melt and become watery!

Any recipe will do as long as you substitute a room temperature butter with a stone cold one.

Let me debunk some other myths about ingredients and technique used for Italian meringue buttercream:

1. Use only french butter with more fat content.
Not true. I tried to use the cheapest Australian butter I can find in the grocery and it worked just as well as the french butter counterpart. However, your buttercream may weep due to more water content in Australian butters.

2. Do not use whisk when mixing the butter with the meringue.
Not true. You can use whatever attachment as long as it does the work of incorporating the butter. For me, as the butter is stone cold I used the Paddle attachment first and when I started to see my mixture curdles, I changed to whisk attachment. Im using a Kitchenaid by the way. :)

3. Use whatever food coloring.
Not true. Only gel coloring (Americolor) worked best for me. Wilton works great as well but other coloring I find in Bake king doesn't work well. 

4. Cook syrup until 148deg.
Not true. My syrup tried to smell when it reached this point. Again, this could be due to my already hot kitchen so 130deg is just nice for the syrup to reach that soft-ball stage.

5. When your mixture curdles, you failed. 
Not true. It's actually a signed of success that your butter didn't melt into a watery stage. Just keep your mixer running for another 5 mins on a high and eventually, you will see a glorious , luffy and glossy buttercream.


Here's my curdled mixture after i incorporate my stone cold butter.

Close-up of the curdled butter.


Glossy and fluffy buttercream

Chrysanthemum

Primrose. We can do better.

Sunflower

Pretty nice things we created today.


Thanks guys. More debunking soon!


Saturday, March 11, 2017

Flat mess on my first attempt at piping buttercream flowers


I learned few things in today's session:

1. Shortening don't guarantee a sturdy buttercream. You still have to make sure you do not overbeat.
2. I do not like shortening at all. I really tried but I cant. If I can't dare eat it, I wont let my friends or family eat either. 
3. Baking is science. Technique, temperature, ingredient and correct measurement really matters here. You can't just wing it.
4. Baking is not as easy as you think it is. It's an art and you have to master it. Sometimes you have to try multiple times before you perfect the craft.
and lastly
5. Dedication is key. Passion is second. Talent is last.

I thought my buttercream will be as fail-proof because you know, what else can go wrong with an american buttercream with shortening to boot? All (not-so-yummy) ingredients are already in the mix so I was very complacent that no overbeating, tempature or anything can make it go wrong.

I was soo wrong. And because of that, here's the flat mess i created today:

Can't make the leaves stand up. Heartbreak.

You can't even call this flower. 

My arsenal was oh soo ready. 

This is after dividing the buttercream into colors

With Pinky where it all started.

Then again, we are not giving up. I am not ashamed with my mistakes and failures hence Im posting it here for everyone to see. We come out wiser after every failure and we should root on that. Great artists were once amateurs. They just never give up practicing and perfecting their craft.

We will do the same.

Our next post will be a better one.

Thanks for reading!


Friday, February 24, 2017

Piping session


Wednesday, February 1, 2017

Almond choco chip cookie


Tuesday, June 14, 2016

Ham carbonara recipe

Ham Carbonara

Ingredients

• 1 packet of fettucine
• 3/4 cup chopped ham
• 2 tbsp olive oil
• 2 shallots, thinly sliced
• 2 garlic cloves, pressed
• 2 egg yolks
• 1/2 cup shredded parmesan cheese
• 3 tbsp fresh chives, chopped
• 3 tbsp fresh parsley, chopped
• 1/2 tsp cracked pepper

Directions

1. Cook pasta according to packet instructions. Drain and put aside 1 1/2 cups pasta water.
2. Cook ham in hot oil in a large skillet over medium-high heat until crisp. Remove ham, reserving drippings in skillet. Drain on paper towels.
3. Saute shallots in hot drippings until tender. Stir in garlic, saute 1 minute. Add reserved pasta water to shallots and garlic and bring to boil. Stir in hot cooked pasta, and remove from heat. Stir in egg yolks, 1 at a time.
4. Reduce heat to medium and cook, stirring constantly, 2-3 minutes or until creamy. Remove from heat, add cooked ham, parmesan cheese, and remaining ingredients. Sprinkle with additional parmesan cheese, if desired. 

Ready to serve!
MyRecipes.com

https://m.facebook.com/story.php?story_fbid=1173070022726097&substory_index=0&id=216985948334514
Thursday, June 9, 2016

Bake for charity

Took a day off work work to do marathon baking for charity. Because i love baking and it feels good to give back to the community. Made new friends and learned new tricks. Thanks to Leza and her team at The Baking Studio. 

Thanks to Haryani, Nina, Azilah and all new found friends for teaching me baking tricks that I can't learn from the internet. That's on top of all the Kuih recipes they shared. I'm now equipped to bake goodies this coming Chinese new year! 

We will be selling our pastries or "kuih" this Sat at the studio itself. Address at their website below.  Proceeds will be used to help the less fortunate and the remaining unsold goodies will be given to families at Circuit Rd. 

I am physically exhausted but all worth it.

In the studio's cover photo.

My baking profile. 
 
Studio is well equipped. 


Our arsenal


Some of our finished product. French macarons done by yours truly.

Baked 10 containers of these and non a single one cracked! I prayed and hoped for my macaroons success. Answered prayer!

With Leza Parker. Founder and owner of the baking studio.

With the Thursday team.

More of this at the studio's website:
http://www.thebakingstudio.sg/bake_for_charity

Thursday, May 12, 2016

I made my first Ice cream and it's Avocado of course!

And it's sooo yummy I cannot just not eat it all!!

Im a great fan of avos and seldom you can find avos ice cream here in SG ao when a friend posted a pic of herself enjoying Avocado ice cream, i said to myself in all cases I will eat that! 

So goes my first ice cream creation. Thanks to food network for the recipe. I modified it a little bit by adding more avos  coz I want it to taste more of Avos and not of milk.
This is the whipped cream in stiff peaks

That's the avo/milk and whipped cream side by side.

Folding both mixture. Try to fold slowly ao as not to remove as much air bubbles as possible.

Totally folded and mixed!

Sitting pretty in containers

And here's my model Blanj enjoying it! She love it too! 


Thursday, March 31, 2016

Best Carrot Cake Ever Recipe from TipHero

Saw this recipe from TipHero and pinning for experimentation later when I have the time. Quite busy with mommy and work duties at the moment. Ugh. 
Brb.
BEST CARROT CAKE EVER
INGREDIENTS
Carrot Cake:
2 Cups(400g/14oz) caster sugar
4 eggs
2 Cups (400ml/14oz) sunflower oil
1 tsp vanilla essence
2 ¾ Cups (400g/14oz) flour
3 tsp baking powder
1 tsp mixed spice
400g/14oz carrots (finely grated)
Raisins
Cream Cheese Frosting:
2½ cups (1 lb 4 oz/574g) powdered sugar, sifted lightly to remove any lumps
1 lb (16oz/454g) packages cream cheese, at room temperature
½ cup (4oz/120g )unsalted butter, at room temperature
1 tablespoon vanilla extract
DIRECTIONS
1. Whisk together sugar, eggs and oil until thick.
2. Then add in flour and cinnamon and mix gently
3. Lastly, add in the grated carrots and raisins and mix in until well combined.
4. Grease and line a 9” tin. You can also use this recipe to make 2 x 900g/2lb loat tins
5. Pour mixture into tins and place in the oven at 340oF (170oC) for 70- 80 minutes (or until a skewer comes out clean).
6. Leave to cool in tins for 10mins then turn onto a cooling rack.
7. To prepare the frosting: In a large bowl, using an electric mixer on medium-high speed cream cheese and butter until smooth. Then slowly add in the powdered sugar and vanilla until it is smooth and creamy (do not overbeat). Chill until needed.
8. Decorate as desired, maybe with some little frosted carrots!

http://tiphero.com/best-carrot-cake/
Thursday, February 18, 2016

Crispy chicken recipe

Found on facebook. Saving to try later


Sunday, January 31, 2016

Being mom for a child with language delay


This post is not about baking this time. It's more of like sharing you what it's like being a mom to my precious little one.

While I'm writing this post, my son is beside me. We just had a long day of activities and interaction-oriented playing. The picture above was taken yesterday when we went to east coast and play. 

My son now at 2.5yrs and still not talking. He's also not as social as other kids his age like his supposed to. I noticed that when he's still 18 months and I went to have him checked by a specialist. Though they can't diagnose yet if he has autism, but they said he is showing signs.

We are doing early intervention to help him develop his social and language skills as advised by the doctors to avoid those fearful meltdowns. Meltdowns are usually caused when kids can't express their needs/wants. So we have to work on that. Lots of playtime that requires engagements to develop eye contact are required. Meaning you have to do a lot of floor time activities and talk to him often face to face and very close. And you know how it feels when you do all the talking and you don't get any responses? very very despairing at times. And I have to do that every night after I get home from the office battlefield. It's very tiring I know but I can't back down and give up. Doing so means giving up on my son. 

Whoever is reading my post, I hope you include us in your prayers. Not really wishing for a miracle but at least to make things bearable for all of us in the family. I know God won't give us anything we can't handle so I guess this is something he thinks I can manage. 
Saturday, January 30, 2016

Recipe: Microwave Chocolate Moist Cake

So I as looking for some microwave cake recipe for a fast craving fix. Found one from tablefortwo.com. Credits to her for experimenting to get the perfect moist chocolate for us to enjoy! :)


Prep time:  
Cook time:  
Total time:  
Serves: 1
 
Ingredients:
  • ¼ cup all-purpose flour
  • 2 tbsp. unsweetened cocoa powder
  • ¼ tsp. baking powder
  • 2 tbsp. granulated sugar (you can add 1 tbsp. more if you like it a bit sweeter)
  • ⅛ tsp. salt
  • ¼ cup + 1 tbsp. milk
  • 2 tbsp. vegetable oil
  • 1 tbsp. hazelnut chocolate spread
Instructions:
  1. In a medium bowl, whisk together dry ingredients.
  2. Whisk in the milk and vegetable oil until all ingredients are combined and batter has no clumps.
  3. Pour batter into a microwave-safe mug. Mine was a 14-ounce mug. You want enough head space for the cake to rise without pouring over.
  4. Add 1 tbsp. of hazelnut chocolate spread in the middle of the batter. Just drop it in the middle, no need to push it down and sink it in the batter.
  5. Place a paper towel into the microwave and set the mug on top (this is to catch any batter if your mug cake overflows).
  6. Microwave mug cake for 70 seconds on high (PLEASE READ NOTES CAREFULLY BELOW)
  7. Carefully remove from microwave and enjoy!
Notes:
Please note that ALLmicrowaves are different therefore can yield different results and can overcook this mug cake if you aren't careful. My microwave is 950 watts and I cooked mine on 100% power for 70 seconds. Knowing this information, it may help you better judge how long to cook yours for and at what power.

You can totally omit the tablespoon of chocolate hazelnut spread if you want or use a different spread of your choice (peanut butter, biscoff, etc.). I just thought it made the cake even more moist but the cake itself is moist enough without it!
Saturday, November 28, 2015

Recipe: Banana chocolate sheet cake

A super easy, delicious and moist banana chocolate cake. No whipping or machine required!

Recipe type: Dessert, Baking
Serves: 8 - 10 pax
Ingredients:
  • 1 cup (200 g) caster sugar
  • 1 cup (130 g) all-purpose flour
  • ⅓ cup (35 g) unsweetened cocoa powder (I’m using regular)
  • ¾ tsp baking powder
  • ¾ tsp baking soda
  • ¼ teaspoon salt
  • 1 large egg
  • 1 very ripe large banana – mashed with fork
  • ½ cup (120 ml) warm water
  • ¼ cup (60 ml) milk
  • ¼ cup (60 ml) vegetable oil
  • ¾ tsp pure vanilla extract

  • Chocolate Ganache:
  • 4 oz (110 g) semisweet or bittersweet chocolate chips
  • ¾ cup (180 ml) heavy whipping cream
  • ½ tbsp (7 g) unsalted butter
Full instructions:
  1. Preheat oven to 180°C/350°F.
  2. In a large bowl, add in flour, sugar, cocoa powder, salt, baking powder and baking soda and mix well. Set aside.
  3. In another medium bowl, add in mashed banana, egg, milk, warm water, oil, vanilla extract and mix well.
  4. Add the wet ingredients to the dry ingredients and mix gently, until just combined. Do not overmix or the cake will be tough.
  5. Pour the watery batter into a 20 x 20 greased square cake tin or sheet pan and bake for 25 mins or until a skewer inserted comes out clean.
  6. Let it cool in the cake tin set on a wire rack. You could choose to remove the cake from the cake tin or leave it in.
  7. Prepare the chocolate ganache by melting the 3 ingredients in a microwave or in a heatproof bowl set over a pot of simmering water. Let it cool completely.
  8. Drizzle the ganache and spread all over the cake with a flat spatula or butter knife.
  9. Let it set in the fridge for 30 mins before cutting.
  10. Optional: top with your favorite crushed nuts (i.e almonds, walnuts, etc) or sprinkle funfetti color sprinkles all over.
Sunday, November 15, 2015

Review: Delidge Silicone Mat

Hubby bought me a Delidge silicone mat in Amazon when he saw it on sale and he needs to purchase more to qualify for a free shipping weight limit. Didnt really ask for it so its really thoughtful for him to do so.

It arrived today and since i have a ready cookie dough that I'm supposed to bake for Mharcy's bday, i decided to give it a try.

This is my first time using a silicone mat so I'm only gonna test its promise of a non-stick baking. My verdict - it is indeed non-stick! A must buy coz its easy to line on a baking tray than baking paper and you saved the trees as this thing is reusable. 

I think the only thing i didnt like about it is that the size is bigger than my baking tray at home. Maybe my trays are UK sizes and this one is US, im not sure.

All in all, i'll be using this in lieu of the baking paper when doing cookies and macarons from now on. :)


Saturday, October 31, 2015

Why my macarons always crack

It's been years since I first started baking macarons and up until today, I'm still getting cracked batches every now and then. It's really frustrating when you followed all the steps and technicalities and it still fails.

Today, i figured the culprit: Oven temperature. Yes, it has nothing to do the my measuring, meringue consistency or mixing. It is the oven temperature. All the while I was baking at 130C but the perfect temperature to bake in my oven (La germania Italia) is only 110C as per my Tala temperature reading. Yes I dont rely on my oven temperature gauge because it's analog and very inaccurate. I also realised that oven temperature fluctuation of 10-30 degree is normal, but note that macarons are very sensitive so you really have to make sure you achieve a steady state before popping your tray. So word of advise: if you think you did nothing wrong in your mixing, measuring and meringue, check temperature. Make sure you preheat it first and let it reach a stable state with no fluctuations in temp. If possible use a separate temperature gauge for accuracy (I'm using Tala). If you don't have one, just lower than the temp in the recipe you're using to -10 degree. If you're still getting cracks, lower it some more. 

See the temp reading in the below picture. No cracks so far. If you noticed the flat feet, that's due to overmixing. 


Halloween cookies with edible prints

Today I decided to play with edible prints because of the so little time in my hands to craft and decorate cookies. Never thought it would be that easy and I even thought it wouldn't make it to the party that night as I read online that sugar icing needs to be dried at least 24hrs. But luckily I read online that blasting a hair dryer or fan in front of it will speed up the drying process. And they were right, it only took 3hrs to dry it. So here it goes:

Finished product: 


Cutting the cookies

Cut cookies in parchment paper

Pasting edible prints in cookie using sugar icing. 

Outlining to cover edges. Need to work on the outlining part obviously but as I said, I don't have much time. Could be better.

Tada! Finished product. Not too bad right?

I used the butter cookie recipe that I posted here in my site. For the sugar icing, its basically just powdered or icing sugar and milk. Just adjust the consistency according to your liking. For this project I made 2 parts: 1 part is thicker for outlining and another part is a bit runny for flooding.